
If you want to cover or beautify the affiliate link, or to hide the right location of the download file for security or SEO optimization reasons – or any other reason – there is an easy way to do it. This guide is intended primarily for those who do not encounter this problem on a daily basis; and if you are a professional who needs process automation and other, advanced features, this article is more adequate for you>>
A few days ago, I found myself in a technical problem. My brand new Elementor kit Choco concept was ready to be presented to the world, and I needed to figure out a way to allow interested visitors to download the installation file. Of course, the easiest way was to make a direct download link and I did that in the first place. However, there are two problems with this solution: one is security – giving a direct download link poses a certain, though not too great security risk – and the other is that this way individual data and download statistics are not available to me from the WordPress dashboard. So it was necessary to organize the whole thing differently. Logically, this is a need that has existed for a long time, and that the WordPress developers are aware of it – that is, that there is probably a ready-made solution, ie. plugin.
To my surprise, it turned out that finding the right plugin is not an easy task. A solution that most of us who work in WordPress first think of, Easy Digital Downloads, for this occasion has an overly complicated user experience. In its shortest (and at the same time – paid!) version, it can be simplified to the extent that it requires the customer to download only email data (which I wanted to avoid) – but within this plugin, there are no options for simple replacements of a download link.
After testing a few more plugins that were, each, created for a different purpose and therefore all for some reason inapplicable to my issue, changing the search criteria I finally came across a plugin that is an appropriate solution, and the experience of using it now I want to share with you.
Pretty Link is a plugin that has a free version (enough for basic needs) available on the WordPress repository. It is available to users for a long time – at the time of writing this article was available in version 3.2.3 and had over 300K downloads. It was rated excellent by the users, over 92% of the 900+ users who gave it a rating gave it a clean five. In the world of WordPress plugins, this kind of rating is not seen very often. And that is certainly his first recommendation that we meet. There is also a premium version of this plugin – it is great for SEO and blog professionals and people who make a living from affiliate links on their sites.
Installation is done in the way that is common for WordPress plugins. From the main WordPress menu, enter WP Dashboard > Plugins (1) > Add New (2), and enter the name Pretty Links in the search box (3). The requested plugin will then appear as the first suggested one, and it is up to you to click on the appropriate Install Now button (4) and the Activate button, which will replace it in the same place after activation.

The authors made an effort to show users the basic instructions on how to use this plugin immediately after installation:

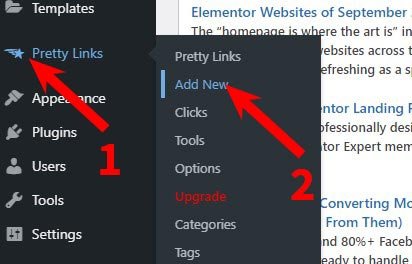
Using this plugin is easy even for beginners. When you for some reason want to mask a link on your site – to make this link appear in a different way to site visitors – create a new Pretty Link. You can do this from the WordPress menu, WP Dashboard > Pretty Links (1) > Add New (2).
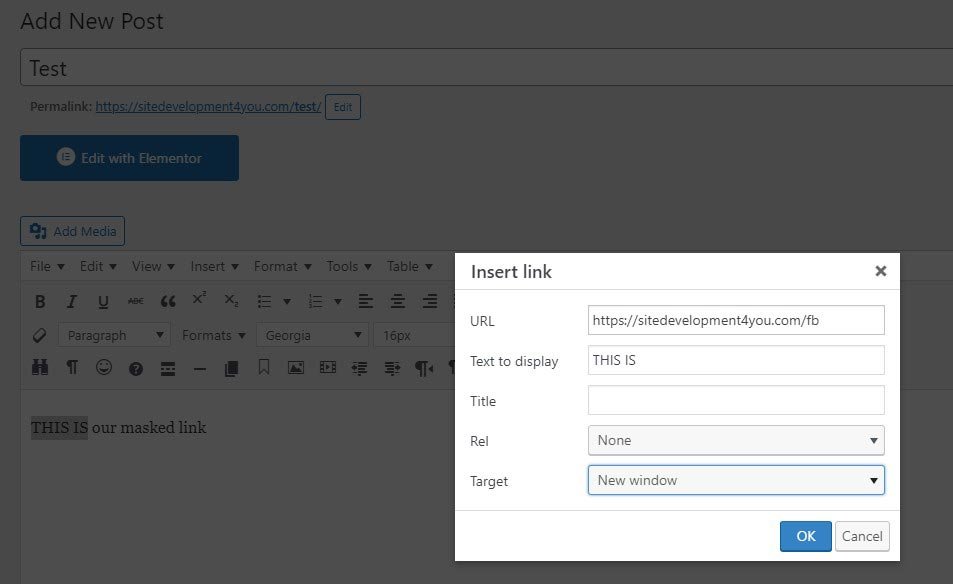
In this example, I replaced the link to Facebook, for the purpose of showing to site visitors, with an internal link https://sitedevelopment4you.com/fb:
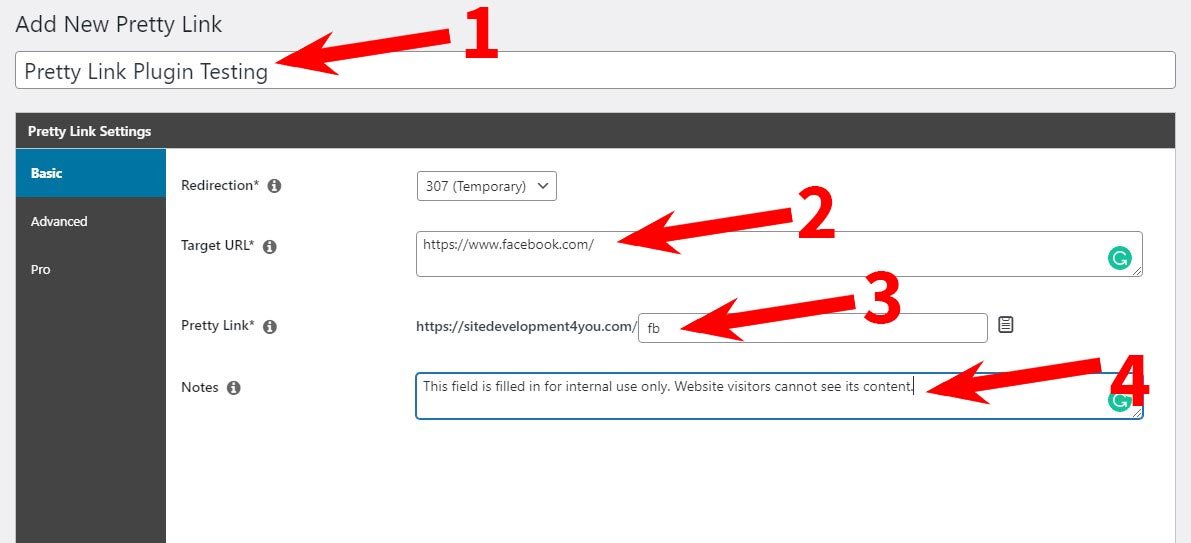
In this example I filled in the following fields:
- In the name field (1) I entered the text by which I will be able to recognize which Pretty link is in the future. The value of this field is not displayed to site visitors.
- Target URL (2) is a real link, the one we want to change, ie not to be directly visible to the visitors of our site. In this example, it’s https://www.facebook.com/.
- Pretty Link field (3) is the link that is displayed; the mandatory part is the URL of your site (in this example, it is https://sitedevelopment4you.com/) and you only edit the extension, according to how you want the link to be displayed; I have added the extension fb which means that you will enter the link https://sitedevelopment4you.com/fb in the WP editor in the future – and this is how site visitors will see it. When they click on this link, they will actually be taken to FaceBook, i.e. at https://www.facebook.com/.
- Notes (4) is what the name says: a note, a comment for internal use, which site visitors do not see.
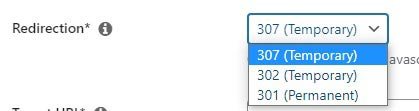
The redirection field allows you to select the type of redirection to be used. 307 is the default value, it is a temporary redirection that since the advent of HTTP 1.1 instead of the previously usual temporary re-direction with code 302, which in this case is the second available option. The third possibility is permanent redirection (301).
In the free version of this plugin, there are additional settings for the newly created replacement link. They can be reached by clicking on the Advanced tab:
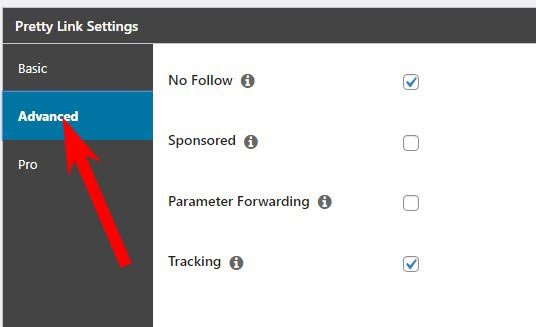
- No Follow: Add a nofollow and noindex to this link’s http redirect header. (default: on)
- Sponsored: Add a sponsored attribute to this link’s http redirect header. It is used mainly for affiliate links. (default: off)
- Parameter Forwarding: Forward parameters passed to this link onto the Target URL (default: off)
- Tracking: Enable Pretty Link’s built-in hit (click) tracking functionality. This is one of the advantages of this plugin, as it provides you with a report on clicks on the replacement link (default: on)
Finally, let’s see how this works on the site.
I created a simple post called Test. This article has short content, only a little text, one part of which (“THIS IS“) is linked by a newly created replacement link from the example above (https://sitedevelopment4you.com/fb)

When the mouse pointer hovers over the link text, our alternate link (https://sitedevelopment4you.com/fb) is displayed in the lower right corner of the browser:
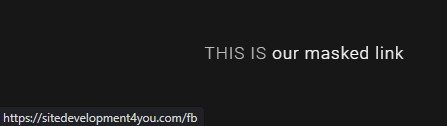
And when we click on this link, the FaceBook website opens (https://www.facebook.com/)
![]()
Finally, it should be said that you can look at a report which shows detailed statistics that include when clicks were made and the URLs from which clicks were made, by selecting WP Dashboard > Pretty Links > Reports.
And, again, if you need more than what is described here, I recommend that you study the premium version of the Pretty Links plugin (you can do this via this link). About this version I wrote a guide similar to this one, which you can read here>>


