
How to customize a checkout page is an old annoying problem for which we were recently offered a new solution through the Elementor Checkout widget. This widget was first launched in Elementor Pro ver. 3.5, along with its twin Elementor Cart widget that was analyzed in a previous article>>
WordPress developers and designers have thus been given a solution to how easily, quickly and in the same way as the rest of the website they can design a WooCommerce Checkout page. This applies exclusively to an element that until recently we could only activate with shortcode [woocommerce_checkout]. Accompanying system things, such as WooCommerce info bar and messages, still need to be adjusted by good old custom coding. If you are interested in this, I suggest you read this article>>
In this article, I will explain how to customize a checkout page in WordPress and how to use the Elementor Checkout widget. To be able to use this guide, you must have WooCommerce and Elementor Pro (version 3.5 or newer) installed and activated on your WordPress site.
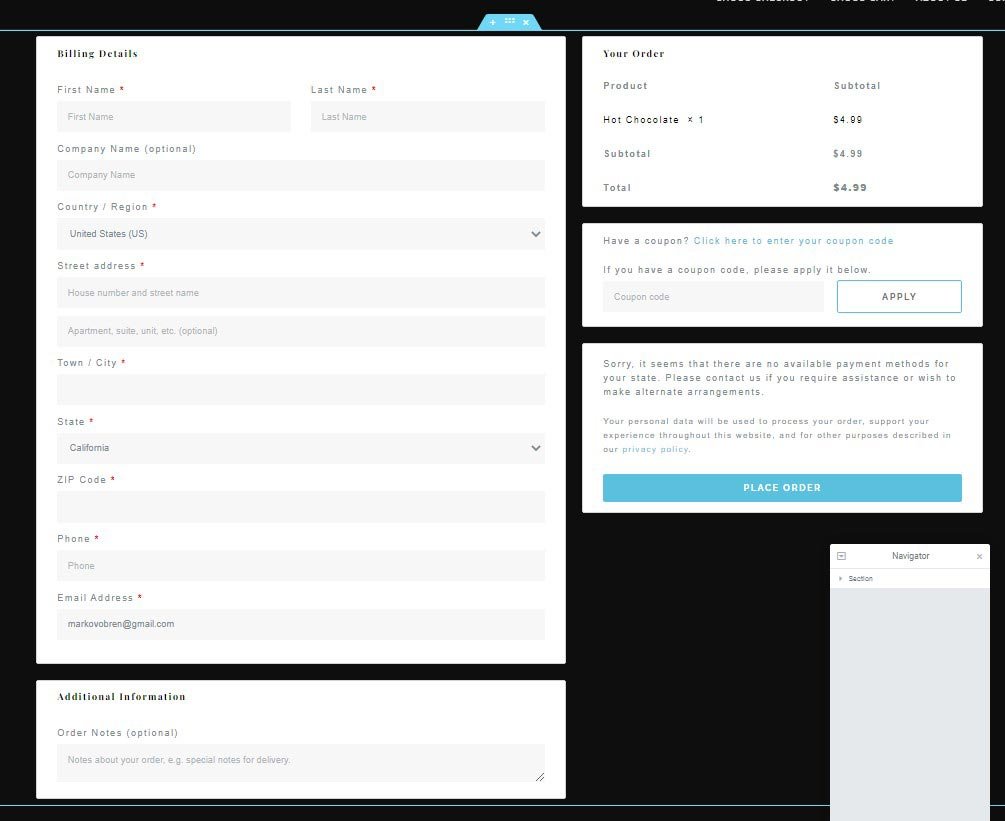
First, let’s see an example from practice. This is the Checkout page on the demo site of the Choco Concept integrated Elementor kit. This page was created using the Elementor Checkout widget:

It is immediately noticeable that the part of the page where the WooCommerce checkout form is displayed is made with much more freedom in determining the style than usual. In this way, the page is aesthetically uniform with the rest of the website. It is this pattern that has been customized using the Elementor Checkout widget discussed in this article.
Customize a checkout page – how to get started
Similar as is the case with the WooCommerce shortcode [woocommerce_checkout], almost any page containing this widget can be declared a checkout page. Of course, restrictions (like that, it’s not a good idea to put both Cart and Checkout on the same page) still apply. The Elementor Checkout widget makes it easy to design, on a similar principle as some WooCommerce themes change the look of predefined WooCommerce pages. But the functionality is still left to WooCommerce.
If you decide to start the workflow by editing the existing predefined WooCommerce checkout page, first remove the default WooCommerce shortcode [woocommerce_checkout]. This shortcode is now redundant. Then enter the Elementor editor on your page.
And in case you are creating a brand new page, the process is similar, except that there will be no shortcode to remove. Later in WP Dashboard > Settings > Advanced > Page Setup you will set WooCommerce this page to be its checkout page.
Select and put the Elementor Checkout widget on the cart page
When you enter the Elementor editor, you can add sections, put titles, texts, graphics, anything you want – like on any other page. Of course, you need to anticipate the place where your checkout section will load.
In the Elementor widget list, find the Checkout widget and drag it to your page.

Immediately after that, the widget will be activated and displayed according to its default settings:
Customize the appearance of the Elementor Checkout widget
The checkout widget is made entirely within the standards set by Elementor. This means that you can select the usual Content, Style, and Advanced tabs in its settings.
Advanced tabs contain completely standard sections related to margins and padding, responsiveness, overlay mask, special positioning, custom CSS… These are quite common things that you can find in all Elementor Pro widgets. Much like I did when writing a guide to use Elementor Cart widget I won’t deal with them in particular. New exciting things that interest us and that bring functionalities that we have not had so far are in the Content and Style tabs.
Features provided by the Content tab in the Elementor Checkout widget
The Content tab of the Checkout widget contains the basic things we need to customize the checkout page. Here you can specify the basic layout, customize section titles and button labels, and even make specific (though not essential) customizations to the basic checkout form.

The General item determines the layout. Two layouts are offered, in one and two columns. If you select a two-column layout (this is the default value) Your Order, Coupon, and Payment sections will be located on the right side of the widget. This only applies to the wide screens, because on the narrower everything is always shown in one column. In case you choose to display in two columns, the Sticky right column option is available. This is not bad to use, since the form on the left side of the widget is by nature higher than what is on the right side, so the right side goes out of focus.
Within the Billing Details, part comes something interesting: partial management of form items. It is not possible to remove existing or add new items to the form – this job is still fully done by WooCommerce (and possibly additional plugins that have done so before). It is not possible to rearrange items or hide them. However, the labels and placeholders can be changed for existing items, and most of them can be assigned a default value:

Within the Additional Information, Your Order, Coupon, and Payment parts, within this tab it is possible to change the position and title content of these parts of the widget. The Additional Information section can be hidden, and the Order Notes field can be customized in the same way as fields that are located within the Billing Details section.
Features provided by the Style tab in the Elementor Checkout widget
Within the Style tab, it is possible to specify the colors and typography of practically everything that is displayed within the Checkout widget. The possibilities of adjusting colors and typography are the same as all other functionalities of this type, which we find in Elementor. This also includes full connectivity with global colors and fonts.
The items are divided into sections: Sections, Typography, Forms, Order Summary, Purchase Button, and Customize. The method used here is the same as in the Cart Widget. I will quote what I wrote there about such an organization because the same is true here:
From the point of view of simplicity, logic, and efficiency of work, the existence of such a defined section of Customize cannot be justified. It would make much more sense if that section did not exist at all and if all the sections that are now opening in that place were initially (immediately after activating) enabled.
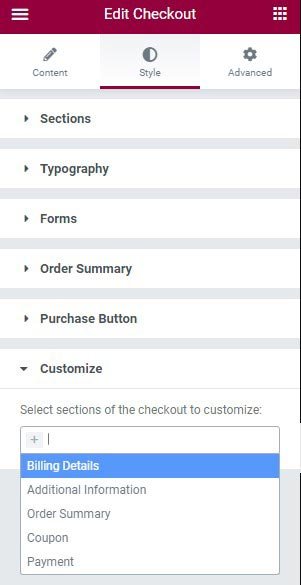
When these additional items are opened, they allow you to customize the background, borders, titles, and other items that can be found in those separate parts of the widget, in a different way than was done for all segments combined in the Sections segment. I have no objections to this. This kind of flexibility is to be commended and gives developers and designers great freedom and opportunities to express their creativity. But I still don’t see the point in initially hiding those possibilities – and then making them available through a section whose name doesn’t even indicate what’s inside.
Conclusion
The guys from Elementor did not disappoint again. We got a great tool, which gives us more freedom to create interesting and well-integrated WooCommerce checkout pages than we have had so far. It is very good that you do not need to purchase an additional plugin for this purpose because it is integrated into the one we are already working on – Elementor Pro.
This tool is just in its infancy and we can expect that it will continue to evolve, and that upcoming versions will offer us even wider possibilities than this. And as it is now, the Elementor Checkout widget seems quite rounded and complete.
Personally, I would like to see an improved ability to manage the fields that users fill out when paying. By that I mean the options to hide, add and rearrange fields on a form. There are plugins that do this well, so we know it is possible. Still, I guess that means thinking differently about the relationship with the basic WooCommerce plugin.
Anyway, we just got another good reason to purchase the Pro version of the Elementor plugin.


