
How to customize a cart page has always been one of the more difficult tasks WordPress developers have faced. WooCommerce is a bit of a hostile platform if you want to easily change the look of its pages and components. To this day, it has remained known as one of the fortifications of “old WordPress” in which it was necessary that, if you wanted to change the look of something, dive deep into HTML, PHP, and CSS files. With new client demands in terms of build speed, aesthetic experience, and responsiveness, this has become a bottleneck in the development of WordPress-based e-commerce.
For this reason, we have been eagerly awaiting the realization of the announced functionalities within the leading WordPress drag’n’drop theme builder, Elementor Pro. Today, here I present how Elementor Pro allows us to customize the cart page – with Elementor Cart widget, a feature launched with Elementor Pro version 3.5.0. And if you are interested in customizing the checkout page, I suggest you take a look at the guide that you can find here>>
To follow this guide, you must have WooCommerce and Elementor Pro (version 3.5 or newer) installed and activated on your WordPress site.
First of all, it should be said that the customization of the cart page in Elementor is not realized through the template, but directly on the WooCommerce shopping cart page. That means you don’t have to go to Elementor Theme builder – as is the case with the Single product or Shop page, for example. This time we need to edit the cart page created by WooCommerce. Another option is to create a completely new page that you will later declare as a Cart page in the WooCommerce settings.
Customize a cart page – how to get started
Elementor Pro starting with version 3.5 brings a new widget, called – to leave no doubt what it is – Cart. Similar as is the case with the WooCommerce shortcode [woocommerce_cart], almost any page containing this widget can be declared a cart page. Even the practical limitations are similar; for example, it is not good to put Cart and Checkout widgets on the same page.
If you decide to start the workflow by editing the existing predefined WooCommerce cart page, first remove the WooCommerce shortcode [woocommerce_cart]. You won’t need it. Then enter the Elementor editor on that page. I like to immediately before I continue working, set the WordPress template from Default to something more appropriate, for example, Elementor Full Width template.
Select and put the Cart widget on the cart page
When you enter the Elementor editor, you can do all the usual things, add titles, images, texts … similar possibilities existed before, but this time you will not, as before, activate the functionality of the WooCommerce cart using the widget Shortcode or WooCommerce Pages.
In the Elementor widget list, find the Cart widget and drag it to your page. Please note: there are two widgets under this name, you need to choose the one marked with a cart sketch.

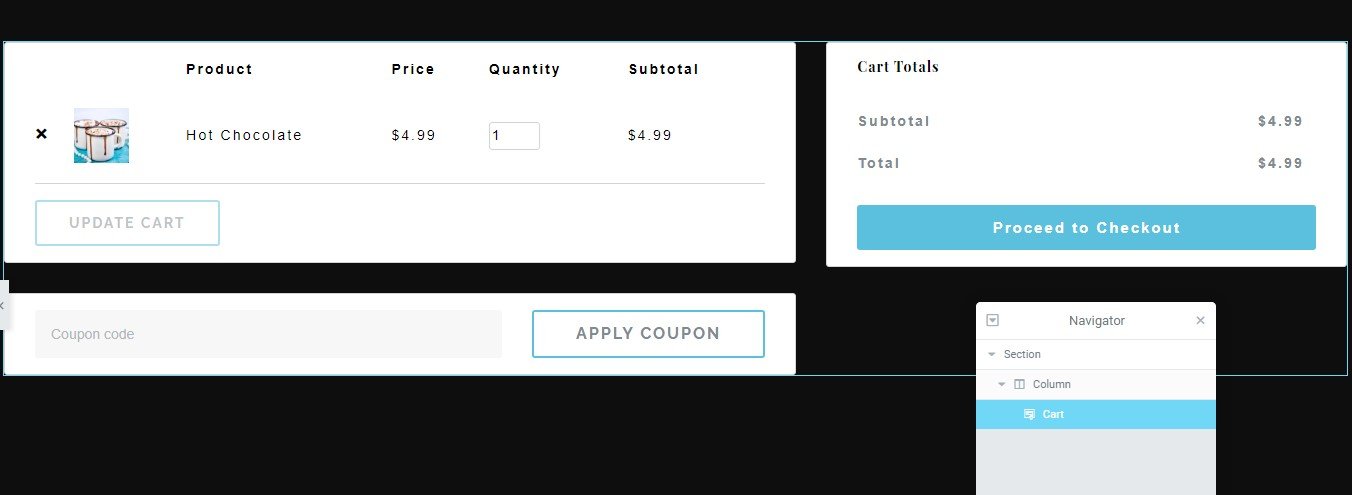
Immediately after that, the widget will be activated and displayed according to its default settings:
Customize the appearance of the Elementor Cart widget
The cart widget is made entirely within the standards set by Elementor. This means that you can select the usual Content, Style, and Advanced tabs in its settings.
Advanced tabs contain completely standard sections related to margins and padding, responsiveness, overlay mask, special positioning, custom CSS… These are quite common things that you can find in all Elementor Pro widgets, so I won’t deal with them in particular. What’s interesting to us, and what brings features we didn’t have before, is in the Content and Style tabs.
Features provided by the Content tab in the Cart widget
The Content tab contains a few items that we need, and that give us features we didn’t have in previous solutions.

The General item determines the layout. Two layouts are offered, in one and two columns. If you select a two-column layout (this is the default value) the Cart Totals section with a Checkout button will be positioned in the right column. This only applies to the wide screens, because on the narrower everything is always shown in one column. In case you choose to display in two columns, the Sticky right column option is available, which can be very useful in the case of a large number of items in the basket.
Under Order Summary, the text written on the Update Cart button is entered. This option is not available if you choose to update the cart automatically. That – whether the conversion will be done automatically – is in the Additional Options section.
Similarly, in the Coupon section, you can enter the text that will be displayed on the Apply Coupon button. Of course, this only appears if you have set WooCoomerce to apply coupons within your e-store.
In the Totals section, we can change the title of the Cart Totals section, and the caption texts on the Update Shipping and Proceed to Checkout buttons.
My comment: The layout inside the Content tab is not the best and most logical I have seen. Since this is not a remark that can usually be given to the creators of Elementor, my best guess is that there are planned other options that will be added to this widget in the future. That is, that the current division of functionality by sections is as it is to allow for smooth subsequent extensions.
Features provided by the Style tab in the Cart widget
Within the Style tab, it is possible to specify the colors and typography of practically everything that is displayed within the Cart widget. Even if only this was enabled with this widget, it would make the work of WordPress developers and designers much easier.
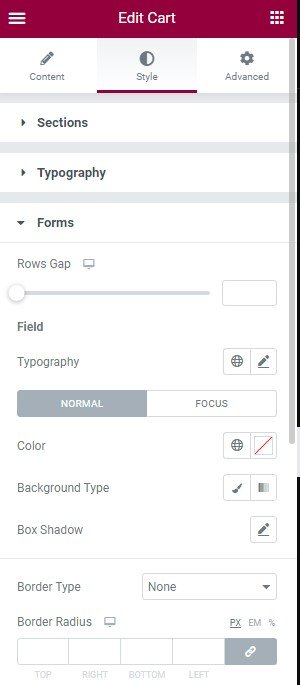
The items are divided into sections: Sections, Typography, Forms, Order Summary, Totals, Checkout Button and Customize. In doing so, Customize section serves for the (somewhat confusing) ability to add new sections to further customize individual Cart Widget segments: Order Summary, Coupon, and Totals.
The possibilities of adjusting colors and typography are the same as all other functionalities of this type, which we find in Elementor. This also includes full connectivity with global colors and fonts. For that reason, I will not go into that in more detail. It is much more interesting to consider the solution that achieved by adding a section called Customize.
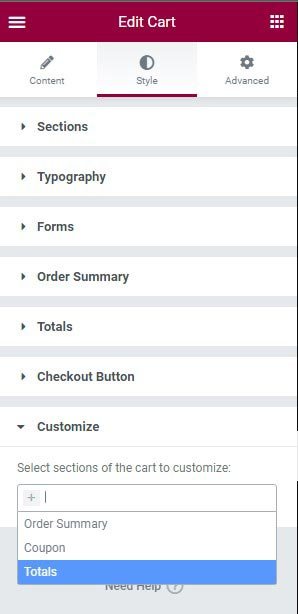
From the point of view of simplicity, logic, and efficiency of work, the existence of such a defined section of Customize cannot be justified. It would make much more sense if that section did not exist at all and if all the sections that are now opening in that place were initially (immediately after activating) enabled.
The only possible explanation that comes to mind is that authors in this way they tried to unify the look of all widgets of this type. Namely, the same solution exists on the Checkout widget, which was presented to the public together with the Cart widget.
Conclusion
By adding Cart widgets to the standard arsenal of Elementor Pro tools WordPress developers and designers have gained a lot. Customizing a cart page has become much simpler and more accessible than before. This is the most serious tool of its kind that I have tested so far. The authors of Elementor should be congratulated on that.
E-commerce is an extremely important area of work, and WooCommerce is a platform that is dominant in this area in the WordPress world. Therefore, it is not surprising that this area, and this platform, were chosen first to be directly connected in this way.
Some of the features in the widget control panel are arranged in a somewhat strange, unusual, and impractical way. The probable reason for that is the planned extensions of the functionality of this widget. But… we’ll see.
The direction in which Elementor is heading with these expansions is what is likely to make a difference from the competition. Practically, in this way, they are given homework around which they need to work hard.
Of course, it should be said that in this way making the connection with WooCommerce is not completed. Some things remain the subject of our coding or simple acceptance of a given state. As a part of this, you can read more about how WooCommerce messages and information bars can be connected with global Elementor colors in this guide>>


